
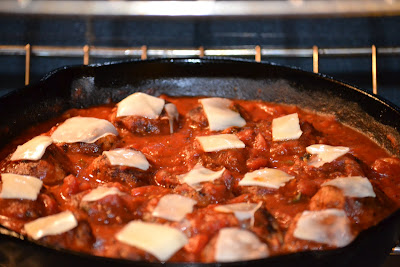
Creamy Scallopped Potatoes with Bacon and Carmelized Onions

It is that time of year when we are planning our Thanksgiving meal options. I have been planning for a few weeks and still can't make up my mind on my theme or what I want to serve. For some reason brussels sprouts are calling my name. I like them, but not many do. I am trying to steer clear of this vegetable, but it keeps popping into my thoughts. There are so many possiblilities on what to serve from the side dishes to the dessert. I have been testing, but still not sure of my master plan. Potatoes are a must, but what kind of potatoes?

There are so many ways to prepare a potato. Mashed, smashed, riced, candied, whipped, baked, etc... Then there are so many varieties of potatoes. Do I choose russets, fingerlings, yams, sweet potatoes, marble potatoes, red potatoes, gold potatoes, etc... The list is never ending. Stress that is what it is. So many options, so little time. What better way to determine what to make, is to make it, try it and circle it to keep it on the list or the big X to discard it. That has been my method of madness lately.

On the list scallopped potatoes. If not for the fact that they will be delicious on my dinner menu, but they are amazing left overs for breakfast. I mean absolutely amazing. I stack them on top of toasted piece of bread and then cover with an over easy egg, now that is bliss. Soft creamy potatoes with liquid gold oozing down the sides, with the crisp tender bread soaking up all this yumminess. Yep, this girl is drooling.

These scalloped potatoes take a little more effort. Not that it is difficult or anything, but the effort will add another layer of flavor. And this is an amazing thing. The only extra steps are to 1. heat your milk mixture and 2. slice and carmelize onions. See not a big deal. And the kicker is to use the same pot. Carmelize your onions first and then while your layering your potatoes and onions, heat the milk mixture. It doesn't have to be boiling, just warm. See it is not that bad. If you do not have a mandolin or a slicer I would suggest getting one. It is not necessary, but a HUGE time saver. I unfortunatly cut all my potatoes and onions by hand (because I am dedicated, no because when I moved I gave away my mandolin and have not yet replaced it). It is a great investment and you will use it more than you think. You can slice apples, onions, potatoes, cucumbers, carrots, etc... you get the idea. And you will want to make this recipe over and over again, not just for holidays.
SCALLOPED POTATOES
1 tsp unsalted butter, plus 3 Tbsp more for dotting
2 Tbsp olive oil
6 oz bacon, cut into 3/4 inch pieces
2 large yellow onions, peeled and thinly sliced
2 cloves garlic, minced
1 tsp thyme
2-3 pounds all purpose potatoes, cut into 1/4-inch thick slices
1 1/2 c. grated Gruyere, Cheddar, Parmesan, or Blue Cheese (I used a mix of all)
2 c. milk (I used 2%, but feel free to use whole, heavy cream or half and half)
1 c. chicken stock
Salt
Black Pepper
Cayanne Pepper
Garlic Powder
Paprika
Thyme
Directions
Preheat the oven to 375 degrees F. Butter a 3 1/2-quart baking dish and set aside.
In a large pot, heat the olive oil over medium-high heat. Add the bacon and cook until browned, about 4 minutes. Add the onions and season with salt and pepper and cook, stirring, until the onions begin to caramelize, about 20 minutes. Add the thyme and garlic and cook 1 minute.
Once the onions are carmelized remove from pot and transfer to a dish. Add the milk and chicken stock to the pot and heat until hot.
In the mean time, spread a layer of potatoes in the bottom of the prepared dish, slightly overlapping the slices. Sprinkle with garlic powder, paprika, thyme, cayanne pepper, salt, and black pepper, and top with a layer of the onions. Followed by more potatoes, onions, and seasoning. Repeat. Pour the milk and stock mixture over the potatoes, dot with butter, and cover with foil.
Roast until nearly all the liquid has been absorbed, about 1 hour and 15 minutes. Remove the foil and top with cheese, continue baking until golden brown and bubbly, an additional 15 to 20 minutes.
Remove from the oven and let sit for 10 minutes before serving.
***Liquid may boil over, take preventitive measures***
A What? Food Blogger Cookie Swap you say? Count me IN!

Here is how it works.You will receive three other bloggers addresses to send them homemade cookies (Mmmmm, cookies). You send them each a dozen of your cookies. In return you will receive 3 different dozen of cookies to drool over, eat, and then go into a sugar coma. Sounds fun! I told you. Then on December 12th everyone who participated will post their recipes and whom they sent their delicious concoctions to.
The deadline for entry is November 15th. HURRY and ENTER! To find out more and enter click HERE. Then click HERE to find out how to package and ship the cookies that you will send to me (feel free to send me cookies even if you do not get my name; trust me I won't mind).
As a side note if you do get my name, or not but still want to send me cookies, PLEASE PLEASE PLEASE disinfect your counter and dishes before preparing my cookies, if you let your animals walk on your counter or eat off your dishes! Just sayin'.
Happy Baking!
Happy Baking!
Taco Bake

Guest Recipe in her own words from the infamous K. Grub...
Ok - a recipe... I didn't use a recipe, silly... but I will try to remember how the Taco Bake came to be:
2 lbs of ground beef (from Miller's Meats of course) - seasoned with 2 packets of Hot & Spicy Ortega Taco Seasoning (on sale at Meijer coupled with a coupon... sheesh - I'm a walking advertisement!)
Actually, we made nachos out of the beef the day before, so it probably ended up being 1.5 lbs...
Anyhoo...
2 cans of Pillsbury Croissant rolls (no coupon... FOR SHAME!), spread them out zig, zaggity around your baking dish, roll the bottom so there's a crust, leaving the small pointy ends to hang over the side for now.
Can of Refried Beans (16oz - the big one), spread it out over the croissant rolls.
Spread out the cooked hamburger.
Layer with gobs of shredded cheese (about 2 cups?)
Take the pointy ends of the croissant rolls and criss cross them over the bundle of ingredients.
Sprinkle with fresh cilantro from your deck's garden pots, even though there was frost that morning.
Bake at 375 for 25-30 (I think???)
Dallop with sour cream and serve with salsa!!
Voila!!
Pumpkin Coffee Bread Pudding accented with Orange and Cranberry.

Fall is here...again. Cold weather is upon us. Its a time to start the ovens and let the baking begin. Fall is a favorite time with hayrides, cider, pies, crisp mornings and warm afternoons, beautiful colors. A great end to the dog days of summer.
As part of the Foodbuzz Tastemaker Program, I received two packages of Godiva Coffee. Coffee on a cool autumn morning, nothing like it. Add some flavors of the fall right along with it, and it is bliss, a great start to the day. One of the flavors Godiva sent me was the Pumpkin Spice blend. I started drooling on the possibilities I could make/bake with the brew. The other flavor was Carmel Pecan Bark, this one I drank and before I knew it, the package was empty.
For this post I wanted flavors that represented the season. I came up with this easy recipe that can be a great start as breakfast or a delicious end as a dessert. A pre-purchased pumpkin bread, that is a few days old, makes this recipe a quick go to dish, leaving time for fall decorating. A coffee custard poured atop sweet pumpkin raisin bread accented with ruby red dried cranberries and citrusy orange zest. Who can resist?

PUMPKIN COFFEE BREAD PUDDING
5 cups day old pumpkin bread, cubed
1/4 cup dried cranberries
3 eggs, beaten
2 cups milk
1 cup strong brewed Godiva Pumpkin Spice coffee
1/4 cup brown sugar
1/2 teaspoon vanilla
1/2 teaspoon cinnamon
pinch of nutmeg
Preheat oven to 350 degrees. Mix eggs, milk, coffee, brown sugar, vanilla, cinnamon, and nutmeg in a bowl. In an ungreased 8x8 dish mix bread and cranberries. Pour egg mixture over the bread. Let sit ten minutes to allow the bread to absorb some of the liquid. Place in the oven and bake for 35 minutes or until an inserted toothpick comes out clean. Cool slightly.
Roasted Guacatillo

I went to the Mercado Mexicano the other day and was browsing around, checking things out. I ventured into the deli and there were some interesting finds. The one thing that I found was a dip called Guacatillo. It screamed of a bright green color and it caught my eye. I had to buy it, just to try it.

I brought it home and opened it up. It was a thin, salsa like substance. The way to eat salsa right out of the container...with a chip, of course. I dipped my chip and tasted the concoction. It was good. Really Good. It was bright, refreshing, acidic, a little bit of heat. I liked it. I checked the list of ingredients on the packaging. Simple, with ingredients that were available and that I knew what they were. It contained tomatillos, garlic, jalapenos, avocados, and onion. I knew I had to replicate it. I set out on a mission and conquered it on the first try. It was that simple and that good. I roasted most of my ingredients to concentrate the flavors and blended them together to develop a nice rich flavor. I also added diced tomatoes, to give it more of a guacamole appearance. It was easy and delicious. I served it with an assortment of vegetables that I cut up and a side of tortilla chips. Easy, simple, Amazingly good.
 |
| Those may look like green tomatoes, but they're not. Those are tomatillos! |
GUACATILLO
12 Tomatillos, husked removed
1 Onion, chunked
2 Serrano peppers
6 Cloves of garlic
1 Lime, juiced
1/2 tsp Salt
4 Roma tomatoes, diced
1 avocado, pitted
1/4 c. Cilantro, chopped
Preheat oven to 450 degrees. Arrange peppers, garlic, tomatillos, and onion on a rimmed baking sheet and roast 10-12 minutes. Cool slightly. Put into a blender, including any juices. Add lime juice, salt, and cilantro. Puree. Cool.
In a medium bowl add the avocado meat and mash to desired chunkiness. Stir in contents of the blender. Fold in the diced tomatoes. Serve with chips and assorted vegetables. Refrigerate.
Kale and Quinoa for Meatless Monday


I happened upon this recipe a year ago from Food52 (click the link for the original recipe) when I was wanting to try Kale, but didn't really know what to do with it. I couldn't find quinoa, so like I stated above I substituted. I used barley. Yep, good old cheap barley for 97 cents a pound. It worked and it was good. The original recipe called for walnut oil. I was not spending that kind of money on walnut oil, that I would use just a few times for it to sit on my pantry shelf. Now, I would MAYBE buy walnut oil, because I would use it as a substitute for some other oil that a recipe called for. Just use olive oil, I still do for this recipe. Oh and the pine nuts that the original recipe called for, yes they were substituted too. I used chopped almonds. Actually the only original ingredients I used for this recipe were the kale, goat cheese, salt and pepper (for this time and photos I did use Quinoa). Guess what it still turns out magnificent each and every time.

Did I mention how easy this was? It is. And it is all cooked in ONE pot. Clean up is easy. In the end you have a great delicious and nutritious dinner waiting for you to enjoy.
KALE AND QUINOA PILAF
2c. salted water
1c. quinoa or quick cooking barley
1 bunch of kale, washed and chopped into 1" length
1 lemon, zested and juiced
1 onion, sliced thin
1 clove garlic, minced
1 Tbsp. olive oil
3Tbsp. almonds or other nut
3-4 oz. goat cheese
salt and pepper
Bring the water to a boil in a LARGE covered pot. Add the quinoa or barley, onions, and garlic, cover, and lower the heat until it is just enough to maintain a simmer. Let simmer for 10 minutes, then top with the kale and re-cover. Simmer another 5 minutes, then turn off the heat and allow to steam for 5 more minutes.
While the grain are cooking, take a large serving bowl and combine half of the lemon juice (reserving the other half), all of the lemon zest, olive oil, nuts, and goat cheese.
Check the quinoa and kale when the cooking time has completed -- the water should have absorbed, and the quinoa will be tender but firm, and the kale tender and bright green. If the quinoa still has a hard white center, you can steam a bit longer (adding more water if needed). When the quinoa and kale are done, fluff and transfer it into the waiting bowl with the remaining ingredients. Toss to combine, seasoning with salt and pepper, and the remaining lemon juice if needed.
Italy remembered with a Rocciata Assisana pastry

A few months ago I went to Italy, mainly Rome. Let me tell you there are A LOT of churches in Rome. I think that I seen them all...twice. They were nice, but it was too much and way too many churches; they were actually running together. Did I mention that I also seen a lot of Crypts? I had fun don't get me wrong. I met some amazing girls whom I had a lot of fun with, from what I remember anyhow (kidding). I wanted to see the sites, but I really went for the food (and the wine).
 |
| Did I mention that I went for the wine? And NO, that is not my pack of cigarettes. |

I did some research before setting out to conquer this magnificent sweet concoction and discovered that the pastry dough was made with olive oil. I tried and tried to make mine as they would in Italy with just the oil as the fat. It didn't work for me. The dough was very greasy. I tried reducing the amount that I added, but no luck. I was getting discouraged. I needed to taste my sweet memory and share with others what I was fortunate enough to have tickle my taste-buds. I went with a standard pie dough recipe. It was good, but just not as flaky as I remembered. I researched again, this time on pie dough and came up with a recipe from Cooks Illustrated via Serious Eats, it contains vodka (click HERE for the recipe). The responses were positive and claim that it was the flakiest pie dough that they had ever made. It was worth a try. I tried. I liked it. I will use it again and again and again. My results were fantastic. For a fluffier, chewier texture try using puffed pastry, rolled to about an 1/8" thick.


My mouth salivating I went to work and created what I remembered in my dreams. Flaky pastry, moist filling, and a satisfied palate. This was my trip remembered. Sweet and tasteful.

ROCCIATA ASSISANA
3 c. apples, sliced thin (I leave the skins on)
1/2 tsp. cinnamon
1 lemon juiced
2 Tbsp. flour
1/4 c. pine nuts
1/4 c. almonds (walnuts, pecans, etc...)
1/4 c. dried fruit (prunes/plums, apricots, cranberries, etc...)
1/4 c. raisins
small jar of apricot jam
Preheat oven to 375 degrees.
Mix the apples, cinnamon, and lemon juice together in a large bowl. Sprinkle with flour and toss to coat. Roll out the dough into a large oval about 1/8" thick if using puffed pastry or 1/4" thick if using pie dough on lightly floured surface.
Apply the entire jar of jam on top of the dough covering the surface, except for 1/2" around the edges. Spread apple mixture on top. Layer with the nuts and dried fruit (raisins too), scattering on top of the apples.
Starting at a tapered end, gently start to roll up the dough, jelly roll style (or like making cinnamon rolls). Once rolled up, place seem side down on a piece of parchment paper (it is not absolutly necessary, but will make life and clean up so much easier expecially because there may be oozing). Brush the top and sides with an egg wash and sprinkle with course sugar if desired. Bake 35 minutes until golden brown, checking occassionally.
The following pictures of the Rocciata were made using a basic pie dough recipe. The above pictures were with puffed pastry.


Cheese Please
 |
| Very simple cheese tray thrown together in a matter of minutes |
A cheese plate is a great way to share a snack with your guests. You may have it as an appetizer or as a course by itself (usually after dinner before dessert or in place of dessert). This is always my go-to pre-dinner choice.
You go to the market or your cheese monger, taste a few samples (this is a must), make a few selections (usually 3 to 5 ((normally an odd number)), add some fruit, nuts, meats, olives, crackers/bread...etc (options are endless), and you are good to go.
Here lately I have been adding jams to my cheese plates, they are great with Parmesan or other hard cheeses. Blue or goat cheese drizzled with honey is always good too. Eat what you like but definitely next time you have guests over, make a cheese plate, you won't regret it!
Its Party Time with Red Velvet Cupcakes!

"Summer Blueberry Pie" was the first post on the site. We were just reminiscing about that pie at the party. I am getting the urge to make it again real soon. I recommend that you check out the post and make it sometime in your near future.


RED VELVET CUPCAKES
2 c. sugar
2 sticks butter, room temperature
2 eggs, room temperature
2 Tbsp. cocoa powder
1 Tbsp. Nestle Quik powder
2 oz. red food coloring
1 tsp. vanilla
1 c. buttermilk
1/2 tsp. baking soda
1 Tbsp. white vinegar
2 1/2 c. flour
1 tsp. salt
Preheat oven to 350 degrees. Cream together butter and sugar. Add eggs one at a time. In a small bowl mix cocoa powder, Nestle Quik, and red food coloring together. Add to the butter and sugar. Mix until combined. Add in the vanilla. In a large bowl sift together salt and flour. Alternate adding flour mix and buttermilk to the butter and sugar mixture. In another small bowl mix together baking soda and vinegar (it will fizz) and fold into the batter.
Scoop into foil lined muffin tins and bake for 15 minutes. Bake until toothpick comes out clean. Cool and frost.
Marshmallow Coconut Cream Cheese Frosting
8 oz. cream cheese
1 stick butter, room temperature
1 c. marshmallows, melted
1 lb. powdered sugar
1 c. shredded coconut
Mix the cream cheese and butter. Add in the marshmallow and powder sugar until blended. Fold in the coconut. Spread on cool cupcakes.

Subscribe to:
Posts (Atom)
